The Art of Alt Business Cards

DIYconfetti-businesscards

I went to my second Alt Summit in March to represent J. Sorelle. What an incredible experience! I am so grateful to Alt for the opportunity to attend such a phenomenal conference, and meet inspirational women. Plus, the location, Palm Springs, has been on my wish list for quite some time now. It lived up to all my expectations!

You see (or you already know) that I have a fear of flying. I’ve never loved it, but I had a bad flight that really did a number on me, and then I had kids. We all know the worry and crazy (and really amazing things) that comes out when we have kids. I’m afraid of flying, and I’m really, really afraid of flying without my family with me. I had a ticket to Alt in my online shopping cart two years ago, and made excuses not to go. Last year I had an actual ticket, and just couldn’t do it. It was an investment I wasn’t ready to pay for. And, that irrational fear crept up, and I was afraid to fly there.

This year, I made it happen. A large part of it is because I have the most amazing husband that was willing to go on a road trip with the kids and me to Palm Springs. He always encourages me to do the things I want to do, but am afraid to do. He’s just the best. So, I was able to “work” and play in Palm Springs. Plus it was our first road trip (more to come on that), so it was overall a fantastic adventure to Alt Summit 2019.

Back to Alt, and the point of this post – business cards. The tiny, and maybe not so tiny, cards are the first impression we leave with people, other than our brief (if any) personal interaction. At conferences, I get to meet so many people, and it’s nice to go through my purse at night and remember people, plus it gives me an opportunity to check out their work. At Alt, some of the most creative people in the country bring their business card A-game. So, it’s important to bring a business card that will grab the attention of fellow bloggers and business owners, and help you stand out.

amazing business cards at Alt Summit

This year some of my favorites were:

  • Seeking Alexi and her fun construction pencil
  • Laura Plouzek and her Palm Springs mini pennant from her line XOELLE
  • Greeting cards from the amazingly talented Lisa Bardot with her own artwork on the front
  • Dapper Animal wooden pins (these ladies had the cutest purses)
  • Notebooks I used throughout the conference with fantastic quotes on the front by Salt & Honey
  • A business card with a cute photo and pops of confetti (which very much matches her aesthetic) by the lovely Haeley of Design Improvised 
  • Alison Winterroth‘s biz card, where the beautiful photography speaks for itself
  • Clean and simple, black and white cards by Callie Christensen (the one and only Callie from Slumberkins)
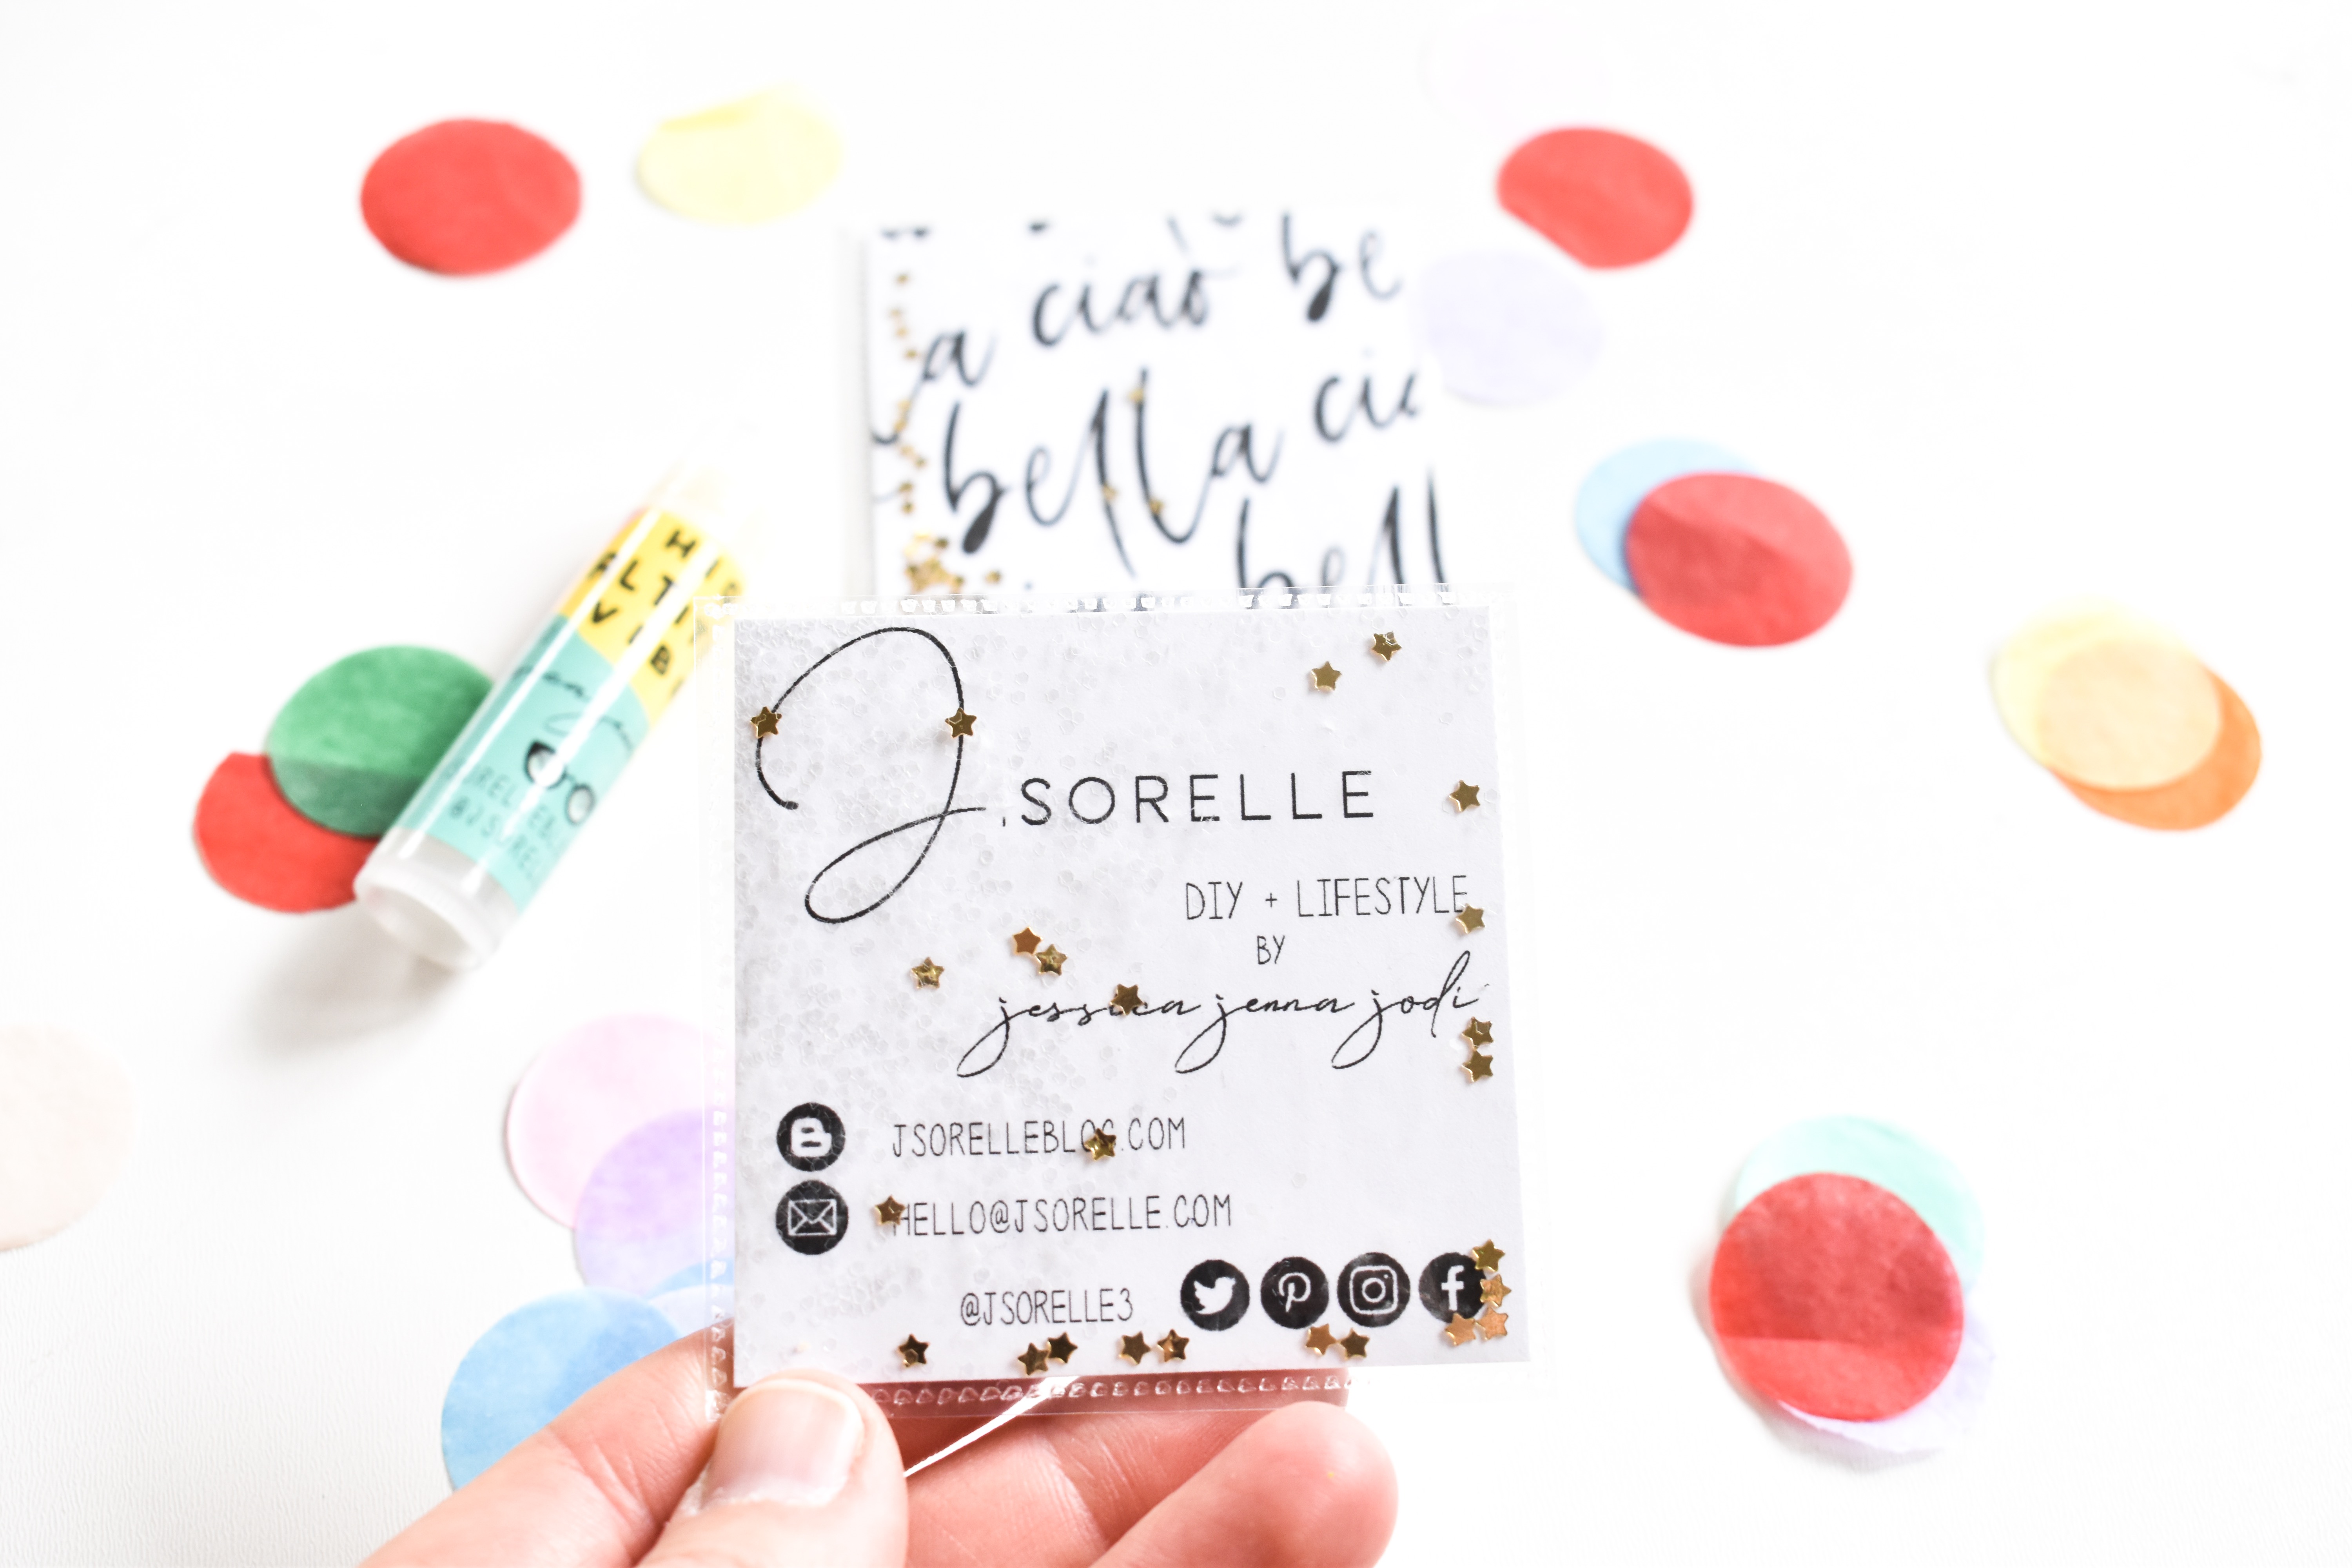
  • Our confetti business cards (tutorial below)
  • The colorful and modern design on Jessica’s biz cards caught my eye, plus we had a great lunch together, so I definitely kept her card.
  • Colorful tattoos from Art 2 The Extreme, the creator of the original rainbow crayon.
  • LaCroix was a sponsor, and their product is so good, they didn’t even need a card, but I just couldn’t help but include their amazing LaCroix straw in there.

amazing business cards at Alt Summit

The must-haves for every card is the name of the business, social media handles, your name and contact information (how to reach you via email and/or phone number), and a word or brief description that tells someone what you do (i.e. graphic designer, photographer, blogger, etc).

The first time I brought business cards to Alt, they were mini file folders with out contact information inside. This time, our business card was inside a confetti party. Plus, we gave an added bonus gift to attendees we met – DIY lip balm. We homemade it with organic ingredients and essential oils. Since we from the high altitude of Colorado, and I was on an emotional “high” at Alt, the packaging was all about High Altitude Vibes. If you were at Alt and want one, we have some leftover and would love to send one your way. Visit us on Instagram and direct message us.

Here’s how we made the cards.

amazing business cards at Alt Summit

 Materials:

  • Business card (Jenna made ours)
  • Protection sleeves for paper
  • Fuse tool
  • Confetti, or glitter shapes (not fine, thin glitter), Target and Michaels

How To:

We do have a close up look at how we made these cards on our Instagram stories. If your more of a visual person, check it out.

Step 1: Once you have a business card, get the other materials ready, and get ready to add some sparkle to your cards. We used the same tool and sheet protectors for our DIY confetti bookmarks, which also has good photos to follow along on how to use the Fuse tool.

IMG_4696

Step 2: Set the business card inside the protective sleeve. There will not be sections like the photo above – this photo is just to show you the tool and the sleeve. You can add about 4 or 5 cards in there at a time once you get into the groove. Set the metal ruler on one side of the card, directly next to the paper (but not on top of the paper), and begin to burn along the edge. Continue until you get to the end of the card, and repeat on another side until you meet the end of the 1st fused side.

Step 3: You should have two sides sealed. Now, garb a pinch or two of glitter, and add it to the card. Next, seal the other two sides.

Now, shake and watch that glitter move. Get ready to make a cute and sparkly impression when you exchange cards.

amazing business cards at Alt Summit


amazing business cards at Alt Summit

Reading Must-Have For Kids: DIY Bookmark

diy-confetti-bookmark-blue-book

Our kids love to read. But, we know those days of reminding them to read over and over again can be frustrating at times. Summer can be especially difficult, and we understand; they spend all year learning in the classroom, and they just want to play. At the same time, it’s important they read. So, we have a few tricks up our sleeve to get our kids reading in the summer.

First, we find good books. No one likes to read a boring book. So, it’s important to pinpoint our child’s interests, and then find books with that subject matter to keep their nose in a book.

Second, make a nook where they are comfortable and feel cozy. This doesn’t have to be an expensive thing. Our kids love their Blankie Tails, and a stuffed animal on the couch when they read. We try to keep the reading environment calm, too.

Third, make crafts related to their books. It’s always fun to read a book with interesting characters, and imaginary worlds. So, we try to incorporate crafts/art with the book they are reading.

Finally, entice them. We haven’t figured out what the reward will be after they read a certain number of books, but kids love a challenge. It can be an ice cream date, or a treat from a store!

Today, we have a project for all the reading we plan to do this summer – DIY confetti bookmarks.

confetti bookmark-open-book

We like our kids to read from actual books. We know the days of a Kindle are in our near future, but before our kids get electronic with their reading, they need bookmarks to keep their spot on a page. One of Jessica’s kids went on a field trip of his dreams this year, so this idea stemmed from his end of year gift to his friends. He developed wallet size photos of his entire class at the field trip, and made DIY bookmarks with the same method we’re showing you today. For my daughter’s class, we added a lot of sparkle and glitter. It’s a party in a book! Gotta love that!

Materials:

Directions:

Step 1: Cut the size of the bookmark you want with a piece of cardstock.

Step 2: Once the tool is hot (about 10 minutes), set the sheet protector on top of the bookmark and begin to press down with the tool along the edges of the paper bookmark. Don’t press directly onto the bookmark, but make a tight outline of it, along the edges. Remember to leave the top of the bookmark free from any fusing because you need to insert confetti.

fuse-tool-sheet-protectors

photo-fusing-tool

Step 3: Now, you should have shapes of bookmarks on the sheet protectors. We were able to make 4 bookmarks per sheet. Next, cut the bookmarks out. Cut close to the edging, but not along the fused “dots.”

fuse-tool-sheet-protectors

Step 4: Fill the bookmark with confetti. Leave the top open for a hole punch and yarn tassel.

star confetti

confetti-star

hooray-confetti-bookmark

Step 5: Fuse the top of the bookmark, and then use a hole punch to punch a hole on the top. For small confetti, you will need a smaller hole punch.

Step 6: Cut yarn, and add a cute and colorful yarn tassel.

CONFETTI-BOOKMARKS-YIPEE-HOORAY

confetti-bookmarks

diy-confetti-bookmark

Now, all you have to do is find a good book, and read, read, read!

confetti-bookmark-book

star-confetti-bookmark

star-confetti

SHOP THE POST:

DIY Merry & Bright Ornament

diy-christmas-ornament-merry-and-bright-red-gold-confetti-tree

‘Twas the week before Christmas, and all through blogging land,
bloggers were hustling with super glue in their hand.

Ornaments were hung on the tree with care,
but one was missing from bloggers who hope to put one of their own there.

We knew in a moment, it must be #swapthatdiy time,
For those who read our first one, it was a sublime.

Lifestyle, DIY, food and fashion – not one of them the same,
A Joyful Riot, Pretty Life Girls, DIY Candy, Cut, Cut, Craft!, A Bubbly Life, The Bold Adobe, The Sweetest Occasion, Tell Love and Party and One Little Minute Blog – we called them each by name!

Happy ornament making to all, and to all a good night.

diy-christmas-ornament-merry-and-bright-red-gold-confetti-tree

It’s our 2nd official DIY swap, and it’s a good one. We made Merry & Bright ornaments to brighten up the sisters of A Joyful Riot holidays. We couldn’t do a Merry without a Bright, so we sent all three. Our ornaments were inspired by big, 36” balloons by Big Ass Balloons, so the ornaments are meant to be 36” balloons with the string of tassels.

Merry Christmas, Malissa and Machelle, and everyone who participated.

Materials:

  • Bulb ornament, less than $1
  • Gold mylar
  • White tissue paper
  • Red acrylic paint
  • Paintbrush
  • Hot glue and hot glue gun
  • Red embroidery string
  • Red craft/jewelry wire, Michaels
  • Drill

 Directions:

Drill two small holes on the top of the ornament, one of each side of the top of the ornament.

ornament-red-wire-gold-confetti-holiday

Trace or free-hand the word Merry & Bright on the ornaments, then paint the words with a small paintbrush and red paint.

merry-and-bright-ornaments-diy-gold-confetti

Fill the ornaments with confetti {we cut small squares of the gold mylar and hole-punched tissue paper for white confetti}. There is a natural static that occurs, so some of the confetti will stick to the sides of the ornament.

diy-christmas-ornament-merry-and-bright-red-gold-confetti-tree

Cut a piece of string about 1 foot long for the tassel string. We made little tassels from the white tissue paper and gold mylar. We tied each mini tassel to the string with a knot, one above the other. Once all the tassels were in a row, we dabbed a bit of super glue on top each one, to keep them in a straight line.

diy-christmas-ornament-merry-and-bright-red-gold-confetti-tassle

Cut a 4-inch piece of the red wire and string it through the two holes on top of the ornament. To add a touch of cuteness, make a bow out of the red wire, and wrap additional wire around center of the bow to keep it in place.

IMG_2947


diy-christmas-ornament-merry-and-bright-red-gold-confetti-tree


How to Throw a Colorful NYE Party with Paper

when the clock strikes midnight

If you blinked, Christmas is over, and a new year is now upon us. The thought of throwing another party can be totally overwhelming, but what if we told you that it could be easy and cost-efficient to #ColorizeYourParty and you could do it primarily with paper?

Intrigued?

Good, because we put together a colorful and fun way to ring in the New Year with Astrobrights Papers that you, too, can put together in less than a day.

Just like Cinderella, we hope year 2015 is a fairy tale for you. However, unlike Cinderella, When the Clock Strikes Midnight, a magical spell will not be broken, but another year will begin. A new beginning. A fresh start. Another chance. A new love. An opportunity for adventure. Travel. Good times {and some bad times too}. Lessons to be learned.

To celebrate 2015 and the magic that happens When the Clock Strikes Midnight, here’s 3 ways you can #ColorizeYourParty

Countdown Clock and Wishes
Colorize Your Party with a large, colorful clock made from paper. Print and cut out numbers, as well as the big hand and little hand, then stick to a wall. You can use a Silhouette cutting tool like we did, or you don’t need a fancy program at all – you can print numbers via Microsoft Word, and then cut. We used DAP BlueStik reusable adhesive putty to stick the paper to the wall, so it’s easily removable and reusable. Every hour, you can move the ‘hands’ as the midnight hour approaches.

when the clock strikes midnight

when the clock strikes midnight

Before the clock strikes midnight, encourage your guests to write wishes for friends, family and loved ones at the party. Your guests will go home with the mason jars as favors, along with heart-felt wishes for 2015. Remember to use colorful Astrobrights Papers to add labels to the top of the mason jars, and 2015 Wishes tags with twine. For extra table height, wrap small boxes like a package with colorful paper.

when the clock strikes midnight

when the clock strikes midnight NYE party

when the clock strikes midnight NYE party

when the clock strikes midnight NYE party

NYE Essentials Wall
Whether you hope for a magical, butterflies-in-your-stomach kiss, a first kiss, an old but favorite kiss, a kiss from your children or a kiss from a friend, this NYE Essentials wall will ensure everyone will have soft lips, good breath and confetti to throw when the clock strikes midnight. We filled 98 cent plastic ornaments with DIY paper confetti {we used a good old-fashioned hole punch to create bright confetti from Astrobrights Papers}, custom labeled lip balm and pink and white tic-tacs.

NYE colorful party with Astrobrights Papers

NYE confetti

NYE party with confetti

To make the wall more eye-catching, we hung tinsel and white twinkle lights with Painter’s Tape, and strung the ornaments on the tinsel. For the big ribbon banner made entirely of paper, we simply printed our sign, added Martha Stewart glitter to NYE letters, glued 3 sheets of paper together, bent the paper and taped the ends to the wall. As for ‘tails’ of the ribbon, we cut the paper and taped it to the wall.

NYE colorful confetti party

NYE midnight ESSENTIALS

NYE party essentials

NYE party essentials

NYE party confetti

IMG_7304

Photo Booth
We thought about doing a glitter photo booth, or even a photo booth with all kinds of paper props, but a simple geometric background with the words This is How G-double-O-D I looked in 2014 seemed like the most honest and to-the-point backdrop for our NYE celebration. You have to own your hotness in 2014 to look even better in 2015, right? We think so.

photo booth this is how good i looked

For the geometric backdrop, we simply cut Astrobrights Papers into 8×8 squares, and then cut it diagonally in half. We used 4 different colors, and once all the triangles were cut, we used a glue stick to stick it to a wood board. For the words, we used a Silhouette cutting machine, but you can trace or print your own letters.

NYE photo booth

We hope you create a unique and memorable celebration using Astrobrights Papers to #ColorizeYourParty, and we wish you a happy, safe and healthy 2015!

Stay inspired all year-long with Astrobrights Papers via Facebook, Pinterest, Instagram and Twitter.

{images via j. sorelle}

side note about our model: Major props to Jessica’s hubby {the handsome model in our photo booth}, who not only took care of an entire family infected with Influenza A before, during and after Christmas, but kindly modeled for our backdrop despite lack of sleep and rest, when we were too sick to do so. 

j. sorelle received products and/or payment for this post, however we love Astrobrights Papers even if they didn’t send us product, and all opinions are ours, we promise. View all of Astrobrights vibrant colors here


salute 2013

New Year’s Eve is almost here…and it’s time to bust out the bubbly. Our personal favorite is Prosecco. This year, try to find a way to infuse ‘bubbly’ into at least one {if not all} aspects of your party. We’ve gathered a few last-minute ‘bubbly’ ideas for your celebration.

Hanging Bubbly Balls, tutorial at Martha Stewart

Sophia Champagne in a Can Favor, Style Me Pretty

Champagne Jello Shots, Perpetually Engaged

Champagne Ice Cream Bar, Damsel in Dior

Confetti Champagne Flutes, tutorial at Pizzazzerie

Grape Champagne {and year predictor} Skewer, see details at Noble Pig

Champagne Bar, Tutto Bella, shoot by Pink Champagne Events
see full shoot here

{images via A Blissful Nest, Martha Stewart, Style Me PrettyPerpetually EngagedPizzazzerie, Damsel in Dior, Noble Pig, Laura Murray Photography}