dinosaurs and divas

Dinosaur and Diva – two simple d-words that sum up my children’s interests at this point in their lives PERFECTLY. My son does not do anything throughout the day without a dinosaur in hand, and my daughter has a purse hung on her shoulder, glasses on her head and sparkly shoes on her feet all hours of the day.

Being 9 months preggo made this year’s party planning more exhausting than most years, but I LOVE parties, details and DIY projects, and swollen feet and Braxton Hicks contractions weren’t going to stop me from throwing a cute and fun party.

I was on a budget as always, but with some creativity, the help of good ole’ Pinterest, hot glue, friends and family and food and drink, the party was a success.

ON THE MENU
Apps
Mexican 7 layer dip
Artichoke dip with chips and veggies
Queso and chips

Dinner
Taco bar
Fruit skewers
Smothered burritos

Dessert
Homemade dinosaur and flower shortbread cookies partly covered with Ghiradelli chocolate
Candy bar with my kids favorite candy: Red vines, Cinnamon bears, DumDum suckers, Starburst and Ring Pops
Chocolate and vanilla cupcakes topped off with toy dinosaurs and tiaras

DIY PROJECTS
{All DIY tutorials to follow in the coming weeks}

Turquoise-dyed Coffee filter #2
I wanted to create a fun background for the dessert table. Something different, affordable and eye-catching. I’ve seen coffee filters added to lamp shades, and they looked great with their ruffly effect. So, I tried color dying coffee filters for the first time, and creating an ombre, floral-esque #2 for my daughter}. Check back in for the DIY tutorial…

{p.s. if your interested in purchasing the #2 made of coffee filters or the #4 made of twigs below, please email me at trejsorelle@gmail.com…I no longer need and will sell for cheap}.

Tree branch #4
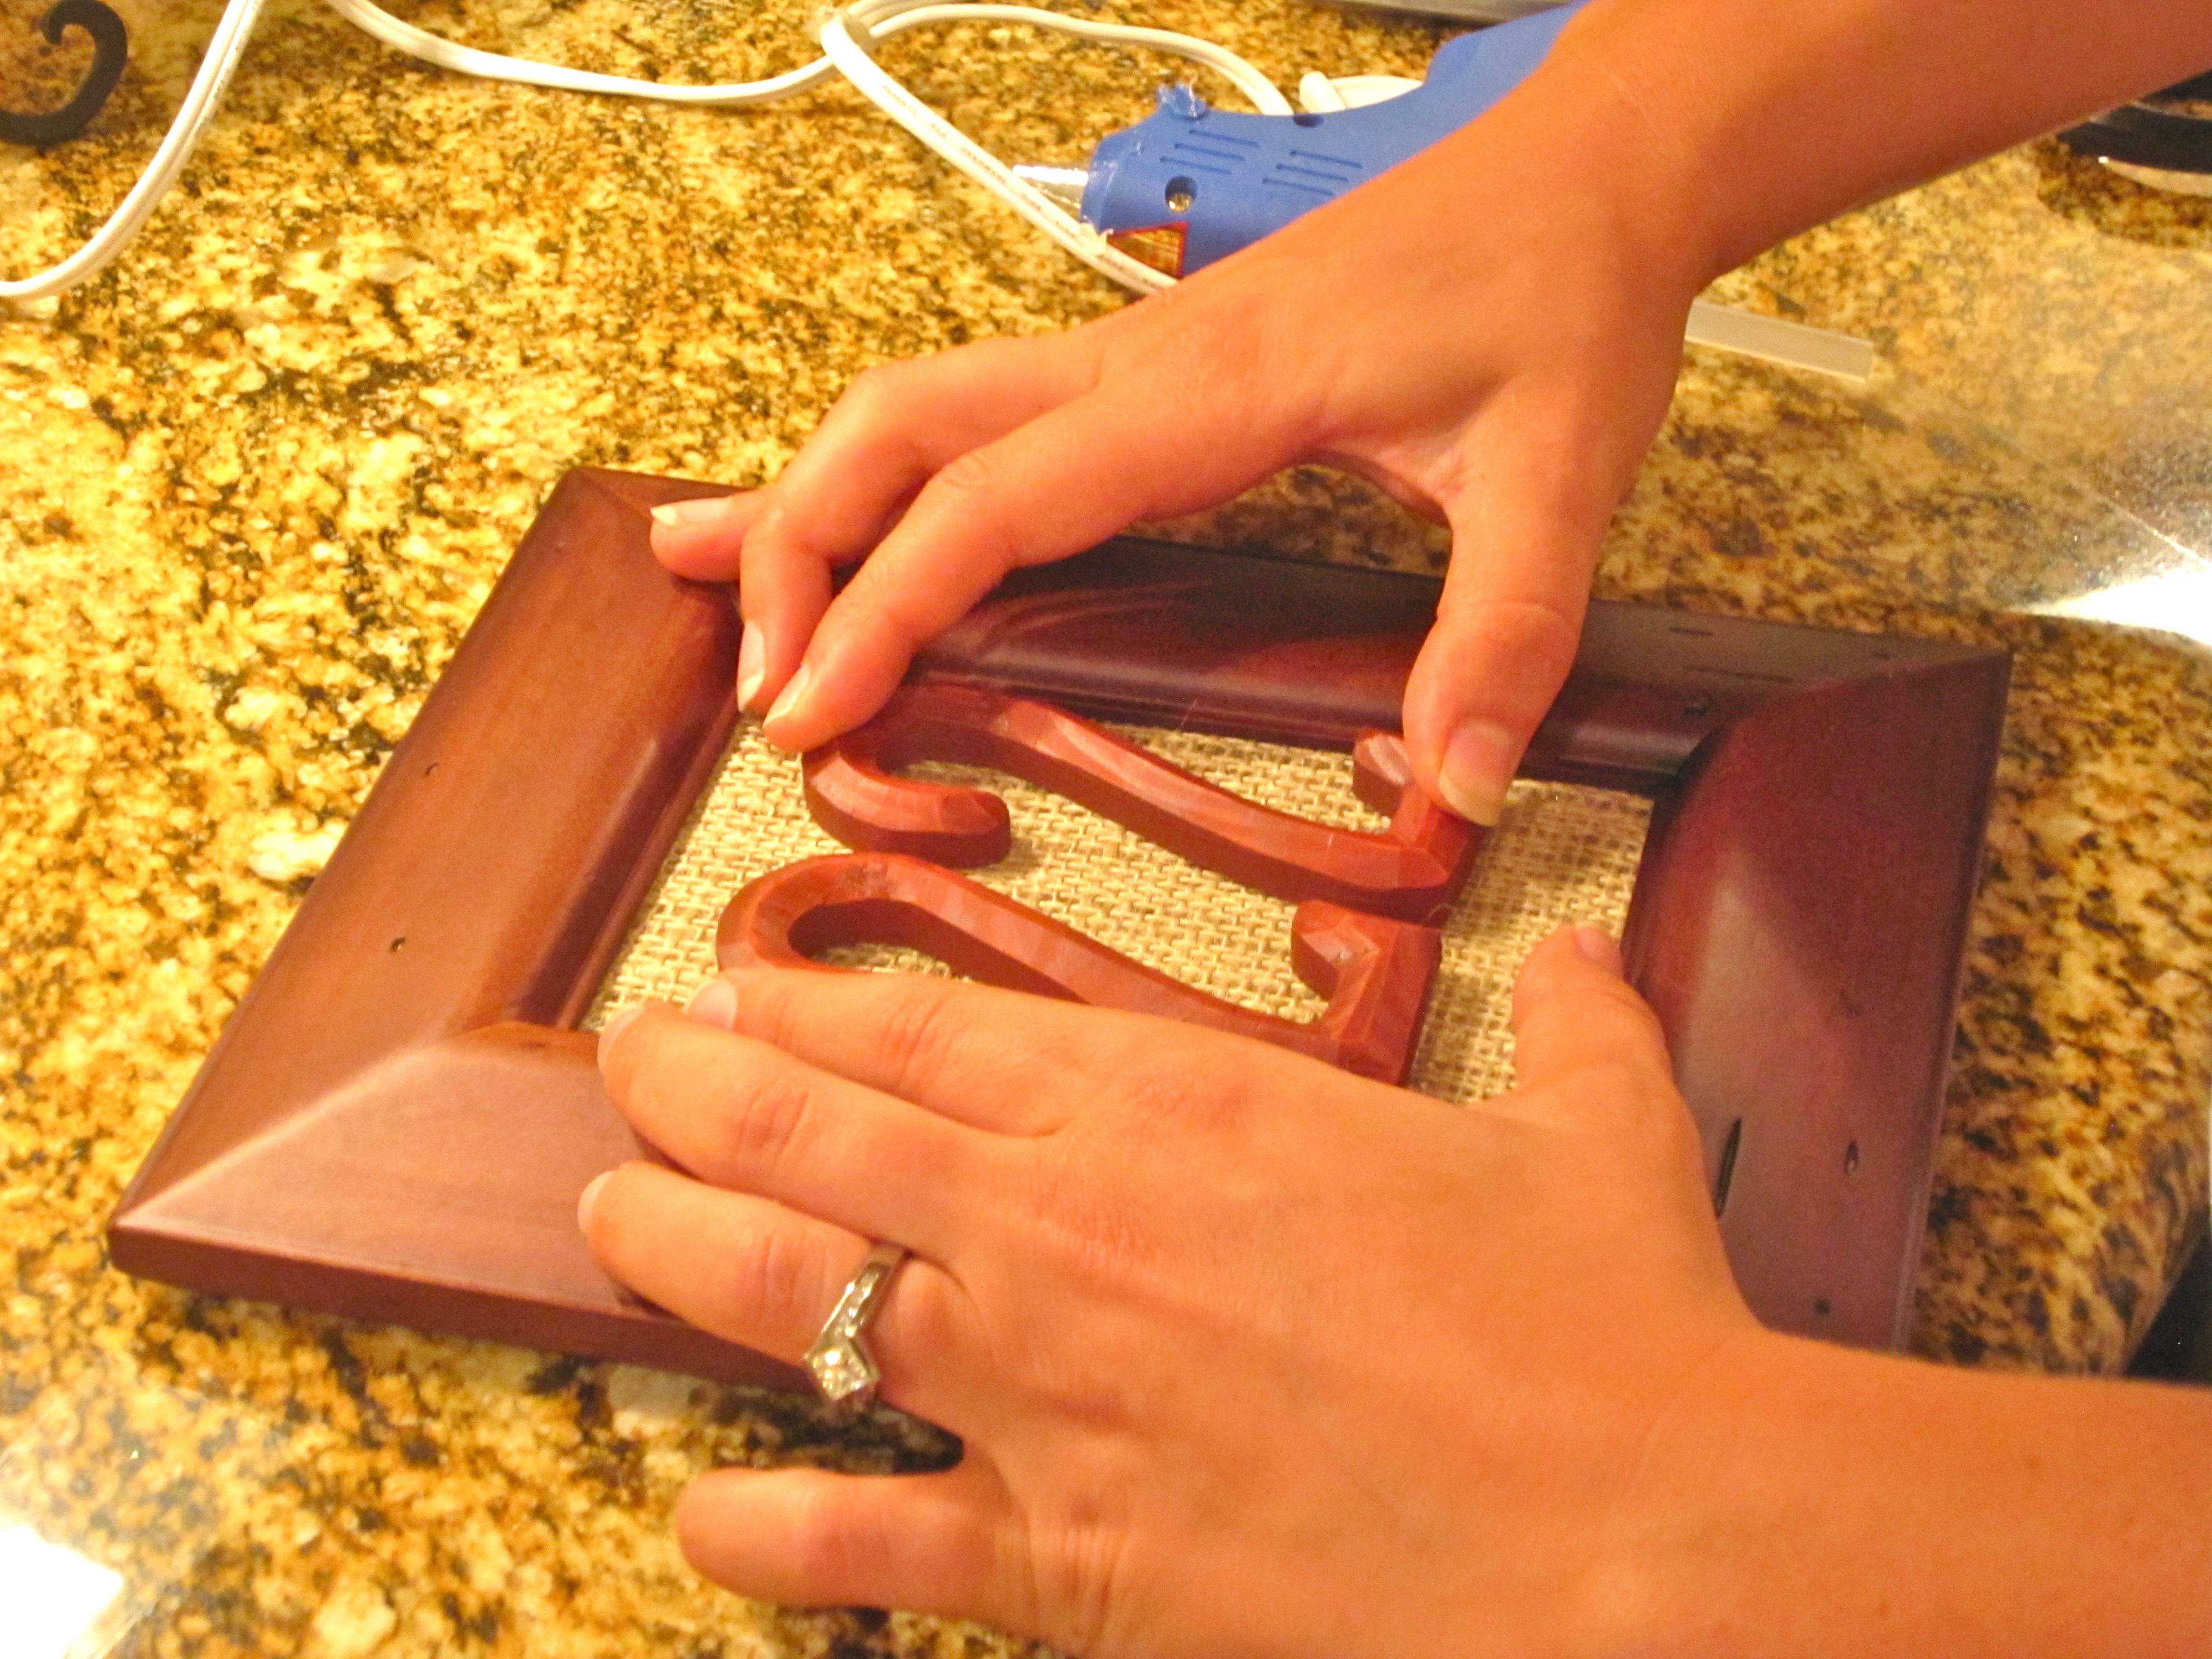
While playing outside with the kiddos and noticing a lot of dead branches on a nearby bush, I broke off about 50 branches from the bush with the creation of a #4 in mind. With a foam board, burlap, wire and hot glue, here’s how my #4 turned out.  

Dinosaur eggs made of yarn
I saw a lot of yarn eggs around Easter time, so I decided to use the same idea, only to create dinosaur eggs in green and orange. Stay tuned for a DIY tutorial…

Paint chip place cards
I gathered paint chips that coordinated with party colors from my local Home Depot, and within 10 minutes, I had place cards. I used Microsoft Word to type the names of the kids friends, and manually fed the paint chips into the printer. Once all names were printed, I used a blade to cut a slit above and below the names to create the perfect napkin holder.

Plate and utensil place setting
I used Kraft paper as a table linen, and used a sharpie marker to trace the kids’ place settings. This was a great linen for the kids table because they could get it dirty and once they were done with it I could throw it away, they could draw on it and it was affordable. 
For the rest of the kids table, I spray painted terra-cotta pots orange and filled with plants made to look like trees, and I spray painted olive oil glass containers pink for the white hydrangeas….something for the boys, and something for the girls! Each child had a mason jar with a curly and colorful straw too!

For the adults table, I kept it simple. I bought tiny twig wreaths {to appear like a dino nest} from Wal-Mart for $2, and put a mason jar and hydrangea in it. Then, for a more rustic touch, I lined up the three mason jars along a 6 ft antique piece of wood.

Another notably cute table setting was Jameson’s drink and volcano table because for a unique and free table setting, I used extra grass turf sitting in the garage from my parents putting green in their backyard.

Dumdum tree for candy bar
Living in the mountains, my staples for DIY projects, like Michael’s and Hobby Lobby are not an option, so good ole’ Walmart had to do. But….no styrafoam balls! What? Who doesn’t carry those? So, my dreams and love for a Dum Dum topiary will be made a reality at the next party maybe.

Plan B…a Dum Dum tree. Walmart had adorable turquoise and pink striped buckets and a florists green tree-shaped Styrofoam, so I went with it…

Volcano
I remember building a volcano for a grade school science project, so my mom, Jameson and I went to work on creating one for his big party. Stay tuned for a tutorial…


D
uct tape water bottle label
My sister {also my own personal graphic designer} just had a baby, so instead of adding another thing to her already busy plate of running an adorable boutique and being an awesome momma, I tried to find another creative water bottle labels not requiring graphic design}. I removed the labels and added pink and orange duct tape around the water bottles. Then, while playing outside with the kiddos I found small twigs that were damp and easy to bend, which made for the perfect J for Jameson’s initial, then I found .29 cents turquoise necklaces from Party City that I cut and shaped into a G, and glued to water bottle.


Dinosaur and girl footprints
I found online photos of dinosaur footprints and toddler size footprints, print copies on color paper on my computer, printed and tape to the floor.

ACTIVITIES
Dino-fabulous egg hunt: the boys hunted for eggs in  the backyard filled with dinosaurs and the girls hunted for eggs filled with rings, bracelets and candy. The kids used their Ikea favor bags as baskets for their hunt.

Erupting volcano

Manicure and pedicure station and Dress-Up Station
The girls could dress like divas from head to toe, and get their nails painted to match their dress-up outfits.

FAVORS
Ikea bags {orange for boys and pink for girls…75 cents each} at each place setting with custom thank you labels filled with: dinosaur noses, dinosaur egg gumballs and dinosaur figurines for the boys and comb and mirror set, white sunglasses, mini-size nail polish and chapstick rings for the girls.
 
Invites and Labels
Done by none other than my fabulous sister at Fleur de Lis, a paperie, Jenna.
The invite is now available in our etsy shop, click here.
VENDOR LOVE

Cupcakes: Mountain Cupcakes, Vail, Colorado
Photography: Meredith Moran Photography
Frames: Ikea
Favor Bags: Ikea
Invitation and paper accessories: Fleur de Lis, a paperie {online Etsy store available here}

pucker up

I was driving home the other day and saw sweet young girls selling lemonade on the corner. It brought me back to my childhood when my sisters and I would set-up a makeshift lemonade stand in front of our house in hopes cars would stop and we could add $10 to our piggy banks. For me, lemonade stands represent happiness, youth, optimism and summertime.

Take time to make yourself a glass of lemonade today…or stop by your corner lemonade stand and reminisce on your childhood summers.

Vintage Lemonade Stand by Reverie and photography by Work of Heart Photography

Lil Luna Yellow Vintage Lemonade Stand
{full DIY tutorial by Lil Luna found here}

Even weddings are not excluded from lemonade stands…how adorable is this wood lemonade stand featured on Wedding Chicks

We LOVE wine barrels {and have some serious wine barrel love when we feature Jodi’s wedding}, so we swooned when we saw a lemonade stand made with wine barrels on Ruffled Blog

So, now that you have lemonade stand inspiration and a DIY tutorial, you might as well spread the lemonade love and throw a lemonade themed party…here are some party tips for you.

DRINK
Obviously, I would serve lemonade…both pink and regular. Make both and serve in a large pitcher like this one from Pottery Barn.
Next to the pitcher, line up mason jars set with pink and yellow striped paper party straws.
For the adults, serve their mason jars with lemonade cocktails spiked with vodka

DÉCOR
Lemons in containers of all kinds – glass jars, hurricanes and galvanized buckets.
A lemonade burlap banner
Glass jars or mason jars filled with change and labeled with a vintage .25 cents sign
Lemons hanging from the ceiling or trees outside; hung with yellow and white twine, of course.
Lemonade and Vodka framed sign on the bar for adults
Single bud vases with a pink peony or yellow daisy, or canned good cans wrapped in a festive yellow and white or yellow and pink decorative paper and ribbon filled with a single {or several} flower buds.
Pink and yellow pinwheels
Signs bought at etsy or diy on wood like Poppies at Play

DESSERT
Lemon, blueberry yogurt loaf by sweet pea’s kitchen {this is yummy, I’ve made it}
Pink lemonade cupcakes using this recipe by real mom kitchen
Pink and yellow striped lemonade flavored hard candy sticks

FOOD
Picnic style food served in individual packages

FAVORS
Mason jar filled with ingredients for lemonade or lemonade cookies
Bottles filled with pink lemonade and a custom label from I Do It Yourself on Etsy
For the adults, make a lemon gift bag with a recipe and ingredients for a lemon, lavender martini like these from A Subtle Revelry

And, last but not least, you can’t have a party without the perfect invite. So, Jenna at Fleur de Lis, a paperie, has created this adorable invite for you. Click here to order from our etsy shop for $15.

 {images via Reverie photographed by Work of Heart Photography, Lil Luna photographed by Jacquilyn Avery Photography, Wedding Chicks, Ruffled Blog and Tutto Bella}

at home with jayson home

When I first discovered Jayson Home while surfing the internet for home accessories a couple weeks back, I knew I was, well…home. I want to go to their landmark store in Chicago just to shop…but for now, online will have to do.

For nearly twenty years, Jayson Home has been selling modern and vintage furnishings, tableware, lighting and home accessories such as candles, pillows and books found from all over the world.

Although I love so many things; in fact, I could buy everything in the store, below are just a few of my favorite accessories from Jayson Home.

1. Burlap Vases, starting at $8
2. Ceramic 12-bud Vase, $22
3. Rustic Table Runner, $54
4. Farmers Market Baskets, starting at $20
5. Rope Handle Tray, $40
6. Moroccan Dessert Plate, $18
7. Checker Mother of Pearl Tray, starting at $250
8. Black Anchor, $8.50
9. Numbered Boxes, $12

P.S. You want to come back tomorrow because we have a fantastic gift idea and fabulous giveaway from Jayson Home. You don’t want to miss it.

{images via Jayson Home}

they are adding to their nest baby shower

A beautiful, vintage iron birdcage from the Pasadena Rose Bowl was the inspiration behind this They Are Adding to Their Nest baby shower. Experts are telling me birdcages are the “it” thing right now in decor, so this birdcage, and all the details to go along with, really NESTled in with the trend beautifully. We adore the soft color palette, vintage china patterns, the beautiful invite, the bird bath centerpiece and as always…the chandelier.

Brooke of Brooke Merrill Photography captured the sweet details, and fills us in on the inspiration behind the photos.

Using square tables and chiavari chairs, Ellen and Brook {the mom-to-be’s inseparable best friends since elementary school} were able to maximize the space within the backyard and allow friends and family to sit with the guests of honor, Jodi and Travis.

According to Brook, “We also pulled in vintage china patterns, silver-plated flatware and a burlap table runner to complete the vintage, chic feel we were going for. The wow factor came from the regency-style, gold and crystal chandelier that we hung over center of the table so that it was the first thing guests saw when they walked outside.”

And, only as truly genuine friends would say, Brook commented, “When it was all over, Ellen and I both agreed that the best part of the evening was being there to witness our best friend with her best friend celebrating a new first adventure together…getting ready to welcome their baby.”

Well done ladies! Everyone deserves life-long friends like you.

VENDOR LOVE
Photography: Brooke Merrill Photography

{images via Brooke Merrill Photography}

diy framed burlap table numbers

I am excited to share another DIY project from my own wedding: table numbers.

For the look, we wanted rustic. Something with burlap (love!). Something simple. Something that complimented the entire table setting.

Here are easy DIY steps to make table numbers with burlap fabric.

You will need:

– hot glue gun
– glue sticks
– scissors
– frames
– wood numbers

How to:

1. Stock up on frames from Michaels.
{hint: never buy frames that aren’t on sale at Michaels! if there’s not a sale goin’ on, wait a few days and there’s guaranteed to be one!}

2. Purchase your fabric. Super cheap.
{we went to Hobby Lobby}

3. Since I’m not the most patient person in the world, I decided to skip tracing the sample photo onto the fabric and dug right in to cutting while tracing.
{it’s okay if it’s not exact – the frame won’t show the edges in the front !}

4. Cover the entire glass with glue from your glue gun. Be quick – it dries fast! Press firm into the fabric after placing it onto the glass. Burlap is tricky – it’s tough to get it to stick completely. Don’t worry if it’s not entirely stuck onto the glass. When you glue the numbers on, that will act as a double coat of glue 🙂
{ps the glue won’t ruin your frames. it’s very easy to peel off – dry or after soaking in hot water for a few minutes! you can definitely reuse the frames!}

5. Place your new burlap covered glass into the frame and close the backing.

6. Glue your wood numbers and carefully place onto the burlap.
{we went to Hobby Lobby for the numbers and stained them red with a wood stain from Home Depot}

7. Voila! You’re done! Absolutely beautiful 🙂

Be creative!
I used these two for the gift table and guest book table to throw into the mix – so fun!

{images via Tutto Bella & Jenna Walker Photographers}