DIY ABC Block Cupcake Topper

baby-blocks-cupcakes-shower-semi-homemade-abc-sprinkles-frosting

A B C
It’s easy as, 1 2 3
As simple as, do re mi
A B C, 1 2 3

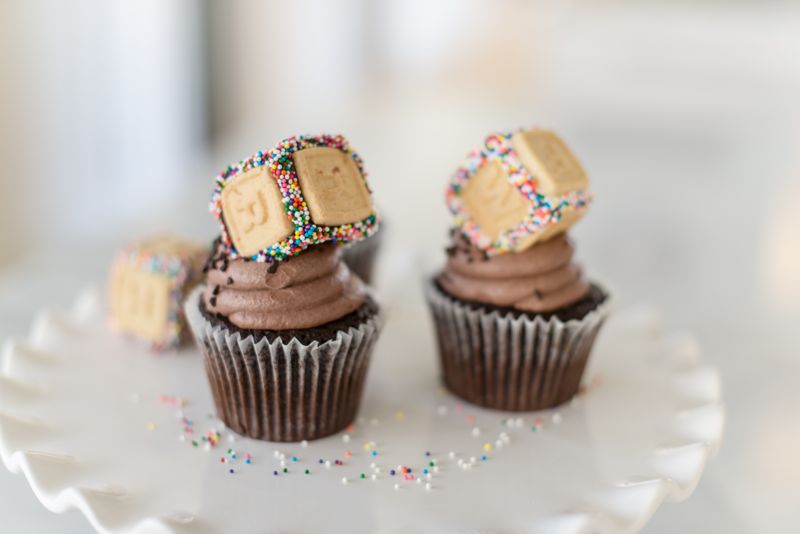
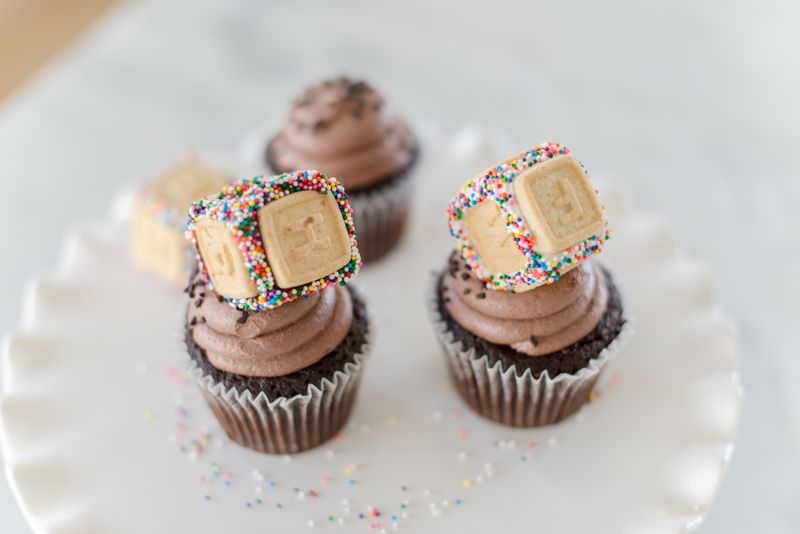
These DIY ABC Block Cupcake Toppers are easy and adorable…and edible if you just can’t help yourself. It’s semi-homemade, so it will look like you took the time to make it special, but you don’t even have to turn on your oven. Win, win!

baby-blocks-cupcakes-shower-semi-homemade-abc-sprinkles-frosting

Ingredients:

Directions:

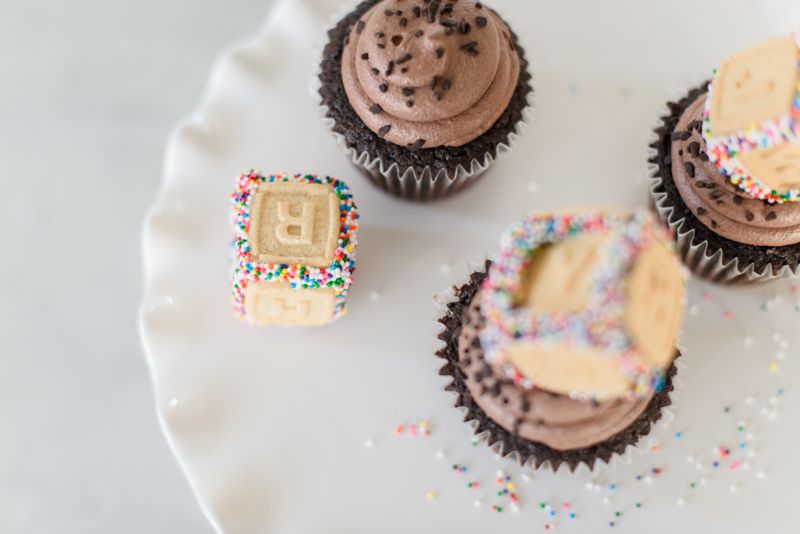
  • Make groups of 6 cookies on the counter.
  • Add frosting to one edge of a cookie {this will be your base}, and quickly place another cookie along the line of frosting.

baby-blocks-cupcakes-shower-semi-homemade-abc-sprinkles-frosting

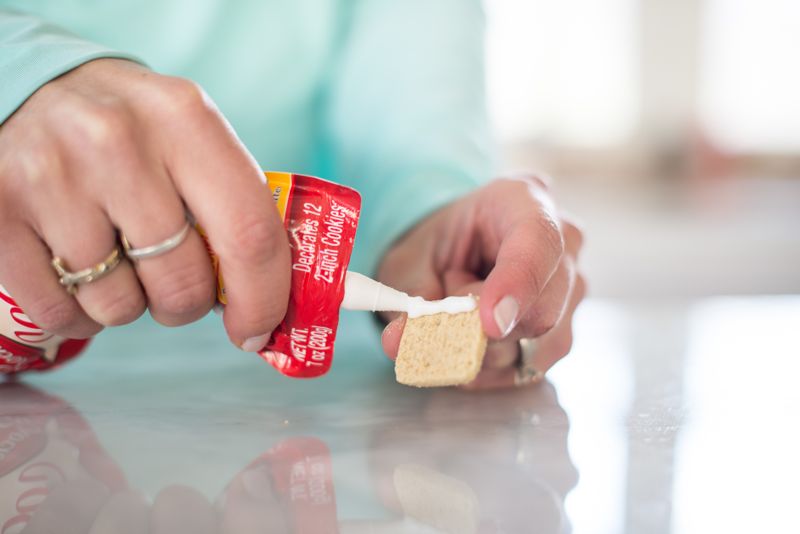
  • Repeat until you have 4 sides. Every time you add a cookie, be sure to add frosting along its side, so it can stick to the cookie next to it. Be gentle with the block while the frosting is still wet.

baby-blocks-cupcakes-shower-semi-homemade-abc-sprinkles-frosting

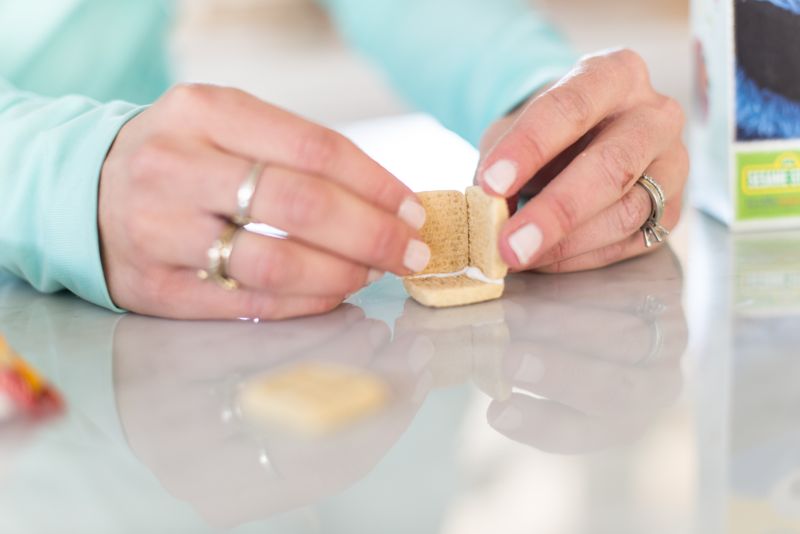
  • Once you have all the sides, add frosting to the tops of all the cookies, and add the top cookie.
  • Gently place the block on the counter, and let the frosting dry for 5-10 minutes until it hardens.
  • Pour a pile of sprinkles in a small bowl.
  • Add a small strip of frosting along all the sides and side-by-side dip the wet frosting into the pile of sprinkles until its fully coated. After all the sides have been covered with sprinkles, set aside to let dry.

baby-blocks-cupcakes-shower-semi-homemade-abc-sprinkles-frosting

photography by Meredith Moran Photography 

Sheep Baby Shower

baby-shower-lantern-sheep-picnic-table-wine-barrel-turqouise_lizellephotography

This baby shower is so adorable, it made us want to count sheep all night.  Then, after a night of no sleep, we want to get on a plane to visit Kyburg farm in Stellenbosch, South Africa…and take those sheep lanterns home with us as a souvenir. Oh, we’re not leaving without a bottle {or two} of wine, too.

big-tree-baby-shower-farm-house_lizellephotography

The gorgeous DIY details at this sheep-themed shower were made by the talented, Tanya Murray.

Lizelle Lotter Photography, thank you for sharing the beautiful images with us.

outdoor-party-entertaining-blanket-picnic-blanket-vineyard_lizellephotography


fabric-banner-baby-shower-decor_lizellephotography

sheep-mobile-baby-shower_lizellephotography

sheep_lizellephotography


chandelier_paper-doily-baby-shower_lizellephotography

paper-doily-baby-shower-wall-decor_lizellephotography

paper-tags-baby-shower_lizellephotography


clouds-wish-tree-baby-shower-activity_lizellephotography

drinks at sheep baby shower_lizellephotography

pregnant mom_lizellephotography

mini-diy-sheep-glass-milk-jars_lizellephotography

sheep-cocktails-cotton-balls-baby-shower-drink_lizellephotography


To make the cute hanging sheep lanterns like Tanya did, simply cut out hands and feet from black paper, add google eyes to the head and glue them to white chinese paper lanterns,

baby-shower-lizelle-photography-sheep-lantern

sheep-white-lantern-diy-baby-shower_lizellephotography

bud-vases-flowers-turqouise_lizellephotography

sheep-cake-cupcakes-baby-shower-dessert

pregnant-moms-baby-shower_lizellephotography

VENDOR LOVE:

Photography: Lizelle Lotter Photography | DIY details: Tanya Murray | Sheep Cake: Whoopeedoo | Rentals: Special Events | Venue: Kyberg Boutique Wine Estate

DIY Air Plant Gift

diy-mothers-day-gift-air-plant-planter-apple-gold-red

We know that sometimes the person we love, depend on and count on the most, is often the one we tell the least. This Mother’s Day, take the time to tell mom thanks and you love her. And, if you cannot celebrate with your mom this Mother’s Day, take the time to honor her life if she is no longer with you, or reach out to the person{s} who is a ‘mother’ figure in your own life.

We know trendy air plants are not totally our mom’s style, but this DIY planter is too cute not to make for her. Plus, she really is the apple of our eyes. We would not be the women and mother’s we are today without her.

This air plant is planted {in this case, when we say planted we mean ‘set inside’ because there is no soil, no mess and no intense tools needed} inside a fake apple. Seriously, these air plants are the plants for us. One month since we made the green purchase…and it’s still alive. We call that a success.

More details on how to make the DIY Mother’s Day gift, which BTW would be an awesome DIY gift for a friend, teacher, co-worker or family member, can be found here.

photo via Meredith Moran Photography

Mother’s Day DIY Party Hats

diy-party-hats-paper-mom-mothers-day-heart-photos

Mom. Chef. Wife. Friend. Housekeeper. Chauffeur. Therapist. Teacher. Coach. Hair Stylist. Nani.

Moms wear many hats. We know our mom did. She amazes us everyday with her energy and love. Sometimes she can wear 5 hats at the same time!

Celebrate all the many hats mom wears this Mother’s Day with DIY photo party hats. The kids will love to help create them and everyone can wear them to celebrate mom.

diy-party-hats-paper-mom-mothers-day-heart-photos

diy-party-hats-paper-mom-mothers-day-heart-photos

Materials Needed:

  • Astrobrights Papers
  • Photos
  • Decorating accessories – sequins, paper, yarn, ribbon, flowers, tissue paper, pom poms, etc
  • Hot glue gun
  • Ribbon
  • String
  • X-acto Knife

Directions:

  • Download a hat pdf online. Print, then cut out the template.
  • Print images of your mom with family and friends on heavy paper. We found it best to re-size the images in Microsoft Word to fit an 81/2 x 11 size paper. Some of the photos worked best with a small border around the edge – it just depends on the photo. Make sure images are horizontal.
  • Trace the hat template onto the image and make sure everyone’s beautiful faces fit in the template {if not, adjust accordingly}, then cut the tracing and use your X-acto knife where the slits are.
  • Gently bend the hat to place the tab into the slot. If it doesn’t fit easily, you can always use a hot glue gun to keep the paper hat in place at the tab seam.
  • On each side of the hat, use a small hole punch or use an X-acto knife to make a X cut mark for the ribbon. You can always glue the hat onto headbands, too.
  • Push the ribbon through the X and tie a knot on the inside of the hat.
  • Embellish, embellish, embellish. We used all the sparkly and pretty things we had around the house. Use the hot glue gun to glue all the embellishments to the hat.
  • For all the ‘hat labels’ we painted watercolor circles with watercolor paint, and glued them to the hats.

diy-party-hats-paper-mom-mothers-day-heart-photos

diy-party-hats-paper-mom-mothers-day-heart-photos

diy-party-hats-paper-mom-mothers-day-heart-photos Mom. Chef. Wife. Friend. Housekeeper. Chauffeur. Therapist. Teacher. Coach. Hair Stylist. Nani.  Moms wear many hats. We know our mom did. She amazes us everyday with her energy and love.  Celebrate all the many hats mom wears this Mother's Day with DIY photo party hats. The kids will love to help create them and everyone can wear them.  diy-party-hats-paper-mom-mothers-day-heart-photos  diy-party-hats-paper-mom-mothers-day-heart-photos  Materials Needed:  Astrobrights Papers Photos Decorating accessories - sequins, paper, yarn, ribbon, flowers, tissue paper, pom poms, etc Hot glue gun Ribbon String X-acto Knife Directions  Download a hat pdf online. Print, then cut out the template. Print images of your mom with family and friends on heavy paper. We found it best to re-size the images in Microsoft Word to fit an 81/2 x 11 size paper. Some of the photos worked best with a small border around the edge - it just depends on the photo. Make sure images are horizontal. Trace the hat template onto the image and make sure everyone's beautiful faces fit in the template {if not, adjust accordingly}, then cut the tracing and use your X-acto knife where the slits are. Gently bend the hat to place the tab into the slot. If it doesn't fit easily, you can always use a hot glue gun to keep the paper hat in place at the tab seam. On each side of the hat, use a small hole punch or use an X-acto knife to make a X cut mark for the ribbon. You can always glue the hat onto headbands, too. Push the ribbon through the X and tie a knot on the inside of the hat. Embellish, embellish, embellish. We used all the sparkly and pretty things we had around the house. Use the hot glue gun to glue all the embellishments to the hat. For all the 'hat labels' we painted watercolor circles with watercolor paint. diy-party-hats-paper-mom-mothers-day-heart-photos  diy-party-hats-paper-mom-mothers-day-heart-photos  {images via j. sorelle}

See more creative last-minute Mother’s Day ideas at Cre8tive Compass.

{images via j. sorelle}

DIY Graduation Gift: Interview in a Box

interview-in-a-box-file-folder-gold-you-got-this-banner-gold-brush-strokes-diy-graduation-gift

It’s Graduation time. It’s time a quarter life crisis may be imminent. It’s time to navigate the real world. It’s time to find a JOB. It’s time to move back in with mom and dad, or pay your own rent. It’s time to ponder if that major that seemed like a good idea at the time may have, in fact, been a waste of time. It’s time to show the real world what you can do!

With our cute new file folder, we created an affordable and unique DIY Graduation gift idea we think every graduate needs this year…Interview in a Box.

interview-in-a-box-file-folder-gold-you-got-this-banner-gold-brush-strokes-diy-graduation-gift

We know our knees buckled with nervousness before every interview and our parents always had the best advice. Just be yourself and do your best. So, with a little wisdom from mom and dad, and a few essentials from Interview in a Box, your interview will be a smashing success.

Interview in a Box 

interview-in-a-box-file-folder-gold-you-got-this-banner-gold-brush-strokes-diy-graduation-gift-notepad-breath-mints-nordstrom-starbucks-thank-you-note

What’s included for the new graduate:

  • DIY brushstroke file folder. Don’t bring this to the interview. Keep it at home, and get organized.
  • Water bottle. Stay hydrated. No one wants cotton breath.
  • Breath mints. Don’t make the interviewer turn his head with a queasy stomach with your morning coffee breath.
  • Notepad and pens {Target, $3}. Be smart and take notes. At least look like you’re listening.
  • Nordstrom gift card. Dress to impress. Cut off jeans and your college sorority sweatshirt is not going cut it. Go shopping and get something that will help you feel confident, professional and classy. You can never go wrong with a shopping spree at Nordstrom, period.
  • File folders {Target}. Your resume will stand out in a metallic folder with your name on it. If you shine, your resume should too.
  • Starbucks VIA. Stay awake for the interview, and since you’re post-college, you’re broke. No fancy latte’s for you.
  • You Got This banner {via our awesome Silhouette cutting machine}. You worked your butt off to graduate from school. Never forget that you’re a boss babe {or dude}, and believe in yourself. YOU GOT THIS. Hang the banner in your room before and after the interview for a personal pep talk.
  • Thank you cards. You will get extra points for writing a hand-written thank you note post interview. No texting, please.

interview-in-a-box-file-folder-gold-you-got-this-banner-gold-brush-strokes-diy-graduation-gift

{images via j. sorelle}